Create a Concept Topic in Heretto: Instructions
Note: You may need to click Editing in the far right corner to display the editing/formatting toolbar.
Practice
Before creating the concept topic, create a folder for the topic to live in.
To create a new folder for your files:
- Click Change.
- Select a new location
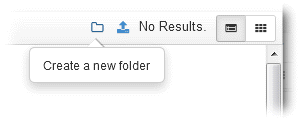
- Click the New Folder icon
- Enter a name for your new folder
- Then click Create leaving Open folder after create checked. This will automatically put you in that new folder; any topic you create will be in that folder.
To create that concept topic:
- Select Author.
- Click Create New.
- Select Concept.
- Enter a title in the Title field, for example, My Concept Topic.
Notice that Heretto creates the file name, which you can change if you want.
- Then click Create and edit
- Click the X in the top right corner to save an exit the topic editor. (Heretto does not require you to explicitly save a file by clicking a save button.)
Experiment with some of the common formatting functions.
To create a bulleted list:
- Place your cursor in the body of the topic next to Paragraph
- Click the Make unordered list icon in the toolbar of the topic.
- Enter several bulleted-list items, pressing Enter after each one.
- Click the Make unordered list icon to end the list.
To create a numbered list:
- Place your cursor in the body of the topic next to Paragraph
- Click the Make ordered list icon in the toolbar of the topic.
- Enter several numbered-list items, pressing Enter after each one.
- Click the Make ordered list icon to end the list.
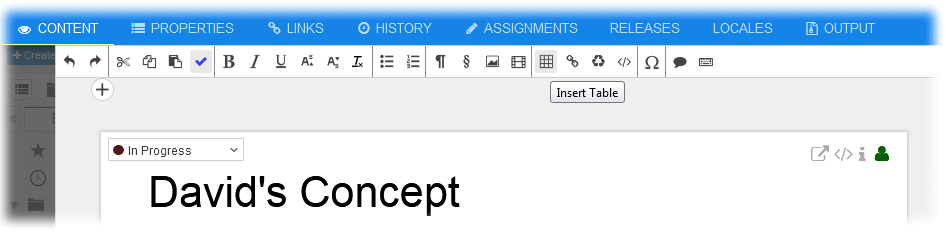
To create a table in a topic:
- Place your cursor in the body of the topic next to Paragraph.l
- Click the Insert Table icon:
- Enter a name for the table in the Title field; no title if you don't want a table title.
- Estimate the rows and columns you'll need. You can always add or delete later.
- Position your cursor anywhere in the table to see the various options available.
- To add a row header, place your cursor in the first column of the table, and click Attributes. Select table in the Elements field, scroll down to rowheader and select first col
The video on concept topic, images, tables, etc., ends at 7:10. Go to task topics and continue the video at 7:10.
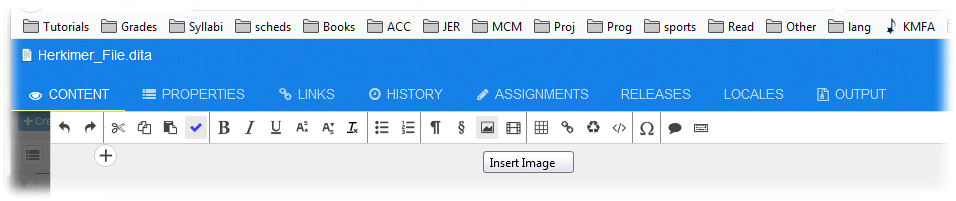
To add an image to a topic:
- Display the topic to which you want to add an image.
- Place your cursor where you want the image.
- In the toolbar for the topic, click the Insert Image icon:
- Click Select File overlay, click Open a new file:
- Hover your mouse pointer over the image, right-click, and take a look at the options available.
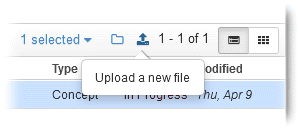
- Click Files to upload.
- Click an image file on your computer, and click Open, and then Upload.
- Select the image you just uploaded, and then click Select in the bottom right. The image will appear in the topic. (To remove an image from a topic, hover over the image in the topic, right-click, and click Remove.
- If the images is too large, click the vertical Attributes tab, select Image in the Element field, then enter 420 as the pixel width (for publish to PDF).
To remove an image you have added or uploaded:
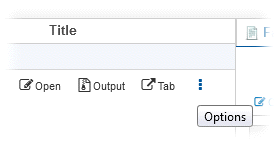
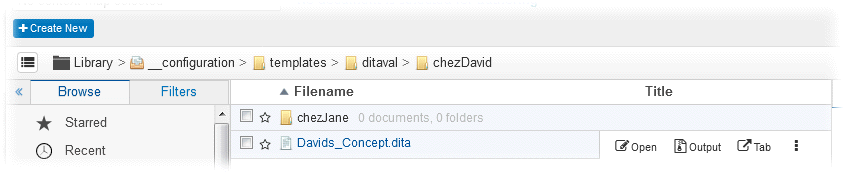
- Click the Options folder (the three vertical dots shown above) to the far right of the image file name.
- Select Move to Trash.
To delete a topic:
- Select the topic then click the Options folder
- Click Move to Trash
To delete a folder:
- Select a folder
- Right-click the folder.
- Click the Options folder (the three vertical dots shown above).
- Select Move to Trash.
Complete This Unit
When your topics or projects are ready for review, send e-mail to your instructor at admin@mcmassociates.io.
Return
Return to your bookmarked course main page.
Programs and information provided by admin@mcmassociates.io.