XHTML/CSS: Borders and Boxes with CSS
Note: Most of the links have been removed from this page.
Web designers who do not know CSS typically use tables to force text or images to position in specified areas of the page and to create borders around specified text. This is a lot of work, a lot of complexity, and a lot of tagging, which can slow the loading of the page. Instead, CSS provides some tags that simplify this process and that provide many new features unavailable in HTML. (Don't get frustrated if you can't find the answer to some these exercises. Contact your instructor for help.)
Borders with CSS
Boxes are nothing other element with border! Place these tags within the body tags of a web page:
|
<p style="border: 3px solid red; padding: 0.15in">
Try putting some text within these tags. Lots of text.
</p> |
Experiment with the following:
- Within the same border tag above, change solid to dotted, then to dashed, and finally to hidden. See a good CSS reference for still other style properties.
- As opposed to the 3px setting, try thin, medium, and thick. To do so, rework the settings this way: <p style="border-width: thin; border-style: solid; border-color: red; padding: 0.15in">
- Also experiment with different values for padding.
- You can selectively which borders to display. Experiment with these tags:
<p style="border-top: thin solid; border-bottom: thin solid; border-right: none; border-left: none; padding: 0.15in;">
your text here </p> -
And finally "float" a box to the right:
<p style="float: right; margin-left: 4.0in">
This text will appear on the left margin, without without borders. Border would be a nice touch though.
</p>
Boxes with CSS and Positioning
The CSS box model, which has everything to do with creating an positioning things like boxes on a web page, is quite complex and requires some study. However, to a taste of it, try the following:
Put these two paragraphs in an HTML file:
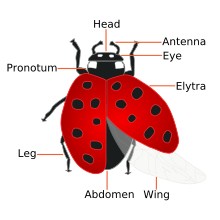
The Coccinellidae are a family of beetles, known variously as ladybirds (UK, Ireland, Australia, Sri Lanka, Pakistan, South Africa, New Zealand, India, Malta, some parts of Canada and the US), or ladybugs (North America). When they need to use a common name, entomologists widely prefer the names ladybird beetles or lady beetles as these insects are not true bugs. Lesser-used names include God's cow, ladyclock, lady cow, and lady fly.
Coccinellids are small insects, ranging from 1 mm to 10 mm (0.04 to 0.4 inches), and are commonly yellow, orange, or scarlet with small black spots on their wing covers, with black legs, head and antennae. Such color patterns vary greatly however; for example, a minority of species, such as Vibidia duodecimguttata, a twelve-spotted species, have whitish spots on a brown background.
Download these two images of ladybugs:
Put this CSS in the styles area of your HTML:
<style type="text/css">
img.floatLeft {
float: left;
margin: 4px;
}
img.floatRight {
float: right;
margin: 4px;
}</style>
Tag the ladybug this way:
<img src="ladybug.gif" alt="alt text" class="floatLeft">
For the other, you'd use floatRight. These tags go above the paragraphs (and outide the p tags) in which they are going to float. If you want to reduce the size of these images, it helps to use something like Photoshop or GIMP (which is free). If you need a recording of how to size an image in Photoshop, let me know. I have not done this task in GIMP.
w3schools has an interesting page in which you can experiment with height and width values: CSS Dimension. Try Set the width of an element using a pixel value and Set the maximum width of an element using percent.
Note: You can stop here if you wish. Once you have done the preceding, you've fulfilled the requirements for this unit.
Frame-Like Format
To do this exercise:
- Start an XHTML file with four or five paragraphs of regular text. Around one of the paragraphs create a thick, red, solid border with padding of 0.15 inches.
- For another of the paragraphs, create a border that shows only on the top and the bottom—otherwise using the same specifications as the preceding.
- Start an XHTML file with two paragraphs of regular text. Here's a real challenge. Create a web page that is partitioned into three areas such as you see in this illustration:
You really haven't seen enough about CSS to do this, but here are some big hints:
First, you can see that you have three sections. Set them up in the style area like this:
div#left
div#top
div#main
Each rule should contain position: absolute; (but play around with contain absolute) and also contain overflow: scroll; (this creates the scrollbars)
Now you have to selectively set top, right, bottom, left, width, and height values for each of the div sections. For example, left would look like this: top: 0; left: 0; width: 200px; height: 100%;
Now top will have these highly nonintuitive settings: right: 0; width: auto;
I'll bet you can figure out what left should be for top! Its height can be any px value you choose.
As for main, you know what its left and top value should be, right? The nonintuitive ones are width: auto; right: 0; bottom: 0;
Complete This Unit
- In your web page or pages for this course, show that you have experimented with these ideas.
- Send e-mail to your instructor with the URLs.
Return
Return to your bookmarked course main page.
Programs and information provided by admin@mcmassociates.io.