These instructions are intended for use by the home gardener who has had little or no experience planting potatoes. Although I am addressing an inexperienced potato producer, I intend for this paper to be used by readers who may have had other gardening experience. This paper could be placed in local nurseries for those who desire detailed instructions about growing potatoes.
How to Raise Potatoes in the Home Garden
If you like tender, juicy potatoes, home-grown are definitely the best. Although the plant of the potato is visible above the ground, the end product is found below the soil. The process from preparing to eating can take as long as 3-4 months, but the results will be worth the wait. Gardening experts agree that the best time for potato planting is about a month before the last spring frost. This time period will allow the potato to emerge from the soil after freezing conditions but be harvested before the extreme heat of summer. Although this vegetable can be purchased rather cheaply in the supermarket, the quality of home-grown potatoes far exceeds those bagged on grocery shelves.
The production of potatoes can be divided into these steps: (1) preparing the soil, (2) preparing the potatoes, (3) planting the potatoes, (4) maintaining the plants, and (5) harvesting the potatoes.
Tools and Supplies
To complete the entire project you will need the following tools:
-
Hoe
Spading fork
Rake
Knife
Tiller (if available)
A tiller is a gas-powered machine that can break up, mulch, and aerate soil with deep-cutting blades that extend deep into the ground. Tillers are useful in small gardens over one-hundred square feet. A typical tiller is somewhat larger than a gas-powered lawn mower and requires a larger, more powerful engine than do typical lawn mowers. Its most important components are its blades, usually measuring 24 to 36 inches across, that turn in a circular motion digging down into the soil with a continuous motion. Gas-powered tillers make preparing a garden much easier, faster, and less back-breaking than doing so by hand with a shovel or hoe. You guide the tiller along in front of you and set the depth that the blades will cut into the soil. You make several cuts through the soil to fully turn it over and aereate it. A garden tiller can also be attached to the rear of a small tractor. This type of tiller provides satisfactory results but may pose some difficulty in controlling the direction.
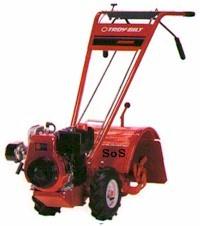
Figure 1. Troy-Bilt Tiller
You will need to purchase the following:
-
Shallow trays
Water hose
Seed potatoes
Fertilizer
Insecticide to control insects
Preparing the Soil
Although potatoes can be raised in virtually any type of soil, best results can be achieved in loam which is a red clay, sandy combination. Once the garden plot has been selected, the following steps will utilize the best growing conditions: (1) clearing the land, (2) loosening the soil, and (3) digging the holes.
- Clearing the land of all debris and plants will improve growth of your potatoes. Best results can be achieved if all debris and previous growth is removed from the area. It is suggested that raking the entire plot will prove beneficial as the plants start to grow.
- Loosening the soil will allow the potatoes to develop into healthy plants. Although a hoe and rake will provide satisfactory results, the job will be much easier with the
use of a gas-powered tiller. These can be rented from local equipment rental facilities.
- Digging the holes correctly will enable the potatoes to grow above and below the ground. Although there is some difference in varieties, most potatoes should be planted from 3-5 inches below the ground. These holes can be dug with a hoe in a long trench or individual holes.
Preparing the Potatoes
Although any type of potato can be used for planting, best results can be achieved with the purchase of certified seed potatoes from a local nursery. After securing the potatoes, they can be prepared for planting by (1) cutting into pieces and (2) sprouting the eyes.
- Cutting the potatoes can be achieved with a small, sharp knife. Cut the seed potato into several pieces making sure each piece as at least one eye and a large piece of the potato.
Note: It is important to include at least one eye on the planting portion since the new potato will grow from the eye. The first food for the plant will be derived from the portion of potato.
Figure 2. Potato plant - Sprouting the eyes will provide better results for future plants. Lay the pieces out on flat or shallow trays and allow them to sit in a sunny, airy place for several weeks until the eyes sprout. These sprouts will be dark green and closely clustered in the eye.
Planting the Potatoes
Once the soil has been prepared and the potatoes have sprouted, you are ready to put them into the ground. This procedure is extremely important to the success of your future crop. The planting can be divided into these steps: (1) inserting the potatoes, (2) covering the potatoes and (3) giving the potatoes a boost.
- Inserting the potatoes correctly will insure the emergence of your plant. Place a small segment of the sprouted seed potato in your previously dug trench or hole. Place one piece of potato every 12 inches. Make sure the eye of the potato is
facing up to direct the plant out of the soil.
- Covering the potatoes with sufficient loose soil will enable the plant to emerge successfully from the soil. If the trench or hold has been dug to the correct depth, you should be able to cover each potato piece with approximately 3 inches of
surrounding loose soil.
- Giving your planted potatoes a boost with water and fertilizer will start them off on the right track. Since the eyes are already sprouted, water and fertilizer will allow for the continued growth of the plant toward the surface of the soil. Sprinkle lightly with commercial fertilizer or manure and then water each location thoroughly.
Maintaining the Crop
Although the potatoes are now in the ground, it is important to follow some simple procedures to guarantee the success of your potato yield. This is a crop with a fairly long growing period, so maintenance of the garden will ensure success. The steps for maintenance include: (1) weeding the plants, (2) fertilizing the plants, (3) controlling insects, and (4) watering when necessary.
- Weeding the plants should be done on a regular basis. Use a sharp-pointed hoe to chop out the foreign weeds. Removal of the chopped weeds will ensure that they do not start to grow again.
Warning: The vines of the potato can grow freely along the ground. Be careful not to damage the growing plant.
- Fertilizing the plants of the potato can ensure growth above and below the ground. The type of soil will determine the correct fertilizer to be used. A local nursery can provide the information you need.
- Controlling insects in your potato garden will enable your plants to continue growing. There is an all-purpose potato dust or spray that can be purchased to control most bugs that will damage this vegetable.
- Watering the plants may be necessary if there is not sufficient rainfall. Keep a water hose nearby to water whenever the plants seem dry. This will become even more important as the summer months get hotter.
Harvesting the Potatoes
After several months of anticipation, your potatoes should be carefully observed to determine if they are ready to be harvested. Because your crop should provide potatoes for many meals to come, it is important to finalize your project with the following procedures for harvesting: (1) determining correct time of harvest, (2) removing potatoes from the ground, and (3) storing the potatoes for extended use.
- Determining the time of harvest will depend upon several factors. When the vines have completely died down, the potatoes below the ground will no longer grow. You may also check the size of your potatoes by digging up in various spots
throughout your garden.
- Removing potatoes from the ground will be hard work but very rewarding. Very carefully dig up a large area of earth around each vine using a spading fork. Turn over the soil and carefully remove the potatoes from the soil. Allow the
potatoes to dry completely.
- Storing the potatoes for extended use will allow you to enjoy them for many months to come. The best environment for storing potatoes is a cool, dark place with plenty of air. Slat crates are much better than solid boxes or bins.
Warning: Potatoes that have been dug up should not be exposed to the sun any longer than is necessary to remove dirt. The sun will make the potatoes acquire an unpleasant flavor.
Although the process of raising potatoes is a time-consuming, lengthy procedure, the results can be very satisfying. Not only can you enjoy the benefits for many months, you may also be able to share your harvest with friends and neighbors.
Programs and information provided by admin@mcmassociates.io.