Headings are the titles and subtitles you see within the actual text of much professional scientific, technical, and business writing. Headings are like the parts of an outline that have been pasted into the actual pages of the document.
Headings are an important feature of professional technical writing: they alert readers to upcoming topics and subtopics, help readers find their way around in long reports and skip what they are not interested in, and break up long stretches of straight text.
Headings are also useful for writers. They keep you organized and focused on the topic. When you begin using headings, your impulse may be to slap in the headings after you've written the rough draft. Instead, visualize the headings before you start the rough draft, and plug them in as you write.
Your task in this chapter is to learn how to use headings and to learn the style and format of a specific design of headings.
General Guidelines for Headings
In this chapter, you use a specific style of headings. This style is the standard, required format if you take a course that uses this online textbook. If you want to use a different style, contact your instructor, lead writer, or graphic designer. Here are some specific guidelines on headings (see the figures at the end of this chapter for illustrations of these guidelines):
- Use headings to mark off the boundaries of the major sections and subsections of a report.
- Use exactly the design for headings described here and shown in the illustrations in this chapter. Approximate the same spacing (vertical and horizontal location), capitalization, punctuation, and typography (bold, italics, etc.
- Try for 2 to 3 headings per regular page of text. Don't overdo headings: for example, a heading for each of a series of one- or two-sentence paragraphs. (Also, you don't need a heading per every paragraph; normally, an individual heading can apply to multiple paragraphs.)
- For single-chapter documents (short documents), apply the first-level heading (Heading 1 in most styles-based applications such as Microsoft Word) to the first heading in the document (traditionally the Title syle, which should not be used).
- For multi-chapter documents (like big reports), apply the first-level heading as the first heading in each chapter.
- Make the phrasing of headings parallel. In the following illustration, notice that the second-level headings use the how, what, when, where, why style of phrasing. The third-levels use noun phrases. (See the section on parallelism for details.)
- Make the phrasing of headings self-explanatory: instead of "Background" or "Technical Information," make it more specific, such as "Physics of Fiber Optics."
- Make headings indicate the range of topic coverage in the section. For example, if the section covers the design and operation of a pressurized water reactor, the heading "Pressurized Water Reactor Design" would be incomplete and misleading.
- Avoid "lone" headings—any heading by itself within a section without another like it in that same section. For example, avoid having a second-level heading followed by only one third-level and then by another second-level. (The third-level heading would be the lone heading.)
- Avoid "stacked" headings—any two consecutive headings without intervening text.
- Avoid pronoun reference to headings. For example, if you have a third-level heading "Torque," don't begin the sentence following it with something like this: "This is a physics principle....."
- When possible, omit articles from the beginning of headings. For example, "The Pressurized Water Reactor" can easily be changed to "Pressurized Water Reactor" or, better yet, "Pressurized Water Reactors."
- Don't use headings as lead-ins to lists or as figure titles.
- Avoid "widowed" headings: that's where a heading occurs at the bottom of a page and the text it introduces starts at the top of the next page. Keep at least two lines of body text with the heading, or force it to start the new page.
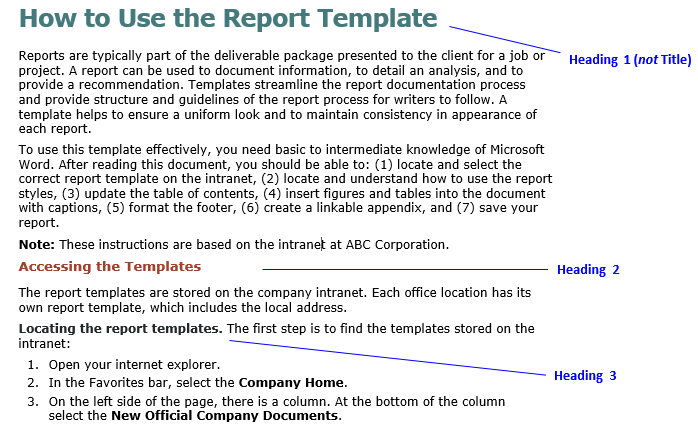
Heading style and format, standard for courses using this online textbook. If you want to use a different format, contact your instructor, lead writer, or graphic designer.
Headings: Specific Format and Style
The style and format for headings shown in this chapter are not the "right" or the "only" one, just one among many. It's important to use this style, however, because that's the way it is for many technical writers—they must write according to a "house" style. Most organizations expect their documents to look a certain way. Using the style and format for headings described here gives you some experience with one of the key requirements in technical writing—writing according to "specifications."
Headings and outlines: headings function like outline elements inserted into the text at those points where they apply.
To see the "house style" for headings—the style and format for headings you will use—see the illustrations in this chapter. Pay close attention to formatting details such as vertical and horizontal spacing, capitalization, use of bold, italics, or underlining, and punctuation. Notice that you can substitute bold for underlining.
Headings occur within the body of a document. Don't confuse headings with document titles. Although titles may look like first-level headings in smaller documents, think of them as separate things. Now, here are the specifications for headings in this chapter.
Note: In the following, notice that the emphasis is on using standard paragraph styles for headings—in sequence and as named. You can change the settings of the styles, but not their names. Why? Technical writers are often tasked with converting documents created in applications like Microsoft Word to other applications such as Adobe FrameMaker, to MadCap Flare, or to systems such as HTML, DITA, or XML. These conversions are greatly facilitated by the functions in the applications that are designed to handle Heading 1, Heading 2, and so on.
First-Level Headings
As mentioned above, use the paragraph style usually named Heading 1 for the title heading in short documents. Similarly, use the Heading 1 style for the title heading for each "chapter" in large documents (such as reports). Follow these suggested guidelines for first-level headings:
- Don't use the Title paragraph style; instead, use Heading 1 (or whatever your application calls it).
- Make first-levels all-caps. (All-caps style is viewed by some as yelling at readers. This guideline can be safely ignored.)
- Use Roman numerals with first-levels. (Use of Roman numerals on headings may seem antiquated; Chicago Manual of Style thinks so. You can safely disregard this guideline.)
- Bold the entire heading including the Roman numeral (if a Roman numeral is used).
- Make first-levels centered on the page.
- Start a new page whenever you have a first-level heading.
- Begin first-levels on the standard first text line of a page.
Note: Quite likely, you will not like the way the headings look "straight out of the box." Modify the style rather than each instance in your document. For details, see Character and Paragraph Styles,
Second-Level Headings
No matter whether you are writing short document or multi-chapter document, the next heading after the first-level should be a Heading 2 (or whatever your software application calls it). Follow these guidelines for second-level headings:
- Make second-levels headline-style caps (also called "title case"). See title case.
- Put the second-level heading all alone by itself (standalone).
- Use bold on second-levels.
- Do not include outlining apparatus such as "A." or "B." or "1." or "2." with second-levels.
- Make second-levels flush left.
- Leave more vertical space above this level of heading than below it. For example, use the equivalent of 2 blank lines between previous text and second-levels and the equivalent of 1 blank line between second-levels and the following text. Notice that the default margins Microsoft Word uses is 10 pts between a regular paragraph and a second-level heading (Heading 2) and 2 pts below.
Note: If you prefer to make third-level headings standalone like second-levels, they may not be visually distinct enough from second-levels. If so, put a top border on second-levels, as you can see in this chapter. These ideas follow the concepts as presented in Robin Williams's Non-Designer's Design Book.
Third-Level Headings
There are two ways you can format third-level headings. Whichever you choose, use the Heading 3 paragraph style (or whatever your application calls it).
Run-in headings:
- Make third-levels sentence-style caps (init-cap only the first word and any proper nouns).
- Use bold for third-levels including the period.
- End third-levels with a period, which is also bold.
- Do not include outlining apparatus such as "A." or "B." or "1." or "2." with third-levels.
- Either indent third-levels standard paragraph indentation, or just start third-levels flush left.
- Do not make third-levels a grammatical part of sentences that follow.
- Whether third-levels are indented or not, start all following lines flush left. Don't indent the entire paragraph.
- Use the standard spacing between paragraphs for paragraphs that contain third-levels.
Stand-alone headings: Apply the guidelines above except:
- Ensure that the format characteristics of your third-level heading make it distinct from your second-level headings, even when seen alone on a page.
For example, if your Heading 1 is a size of 18 points, and your Heading 2 is 14 points, make your standalone Heading 3 12 points. - Do not end a stand-alone heading with a period.
Note: If you need a fourth level of heading, consider using italics instead of bold on the run-in heading format.
Using Word-Processing Styles for Headings
If you manually format each individual heading using the guidelines presented in the preceding, you'll find you're doing quite a lot of repetitive work. The styles provided by Microsoft Word, OpenOffice Writer, and other software save you this work. You simply select Heading 1, Heading 2, Heading 3, and so on. You'll notice the format and style are different from what is presented here. However, you can design your own styles for headings. See Customizing Styles for Headings.
Common Problems with Headings
When you design your own heading style, be careful about going overboard with fancy typographical elements. Also, continue to use the guidelines presented in this chapter; they apply to practically any design. And finally, use your heading design consistently throughout your document.
I would appreciate your thoughts, reactions, criticism regarding this chapter: your response—David McMurrey
